|
| This photo is from the Everyday Elements blog. The owner of Everyday Elements will evaluate your editing and offer critique/advice on your work. If this is something you'd like to try, just click on the link above for more information/instructions. |
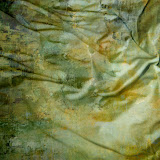
OK this one was challenging for me. I've been practicing on photos of people, and this pic threw me. It's gorgeous, but I honestly had no idea of what I was doing, what I wanted or where I was going with this. I experimented with different techniques I've seen applied in other tutorials -- saving/deleting layers based on whether or not I liked the results With that said, here is my final product:

First I duplicated the original photo twice and turned off the original layer.
On the bottom duplicated layer, I ran the Pixel Bender filter, selected Oil Painting, and played with the settings until I got something I liked. This was my Oil Painting Layer
On the the top duplicated layer, I went to Filter>Stylize>Glowing Edges. I played around with the settings until I got something I liked and clicked OK. Then Image>Adjustments>Desaturate (Shift+Ctrl+U) to remove the color and Ctrl+I to invert the B/W so it looked more like a sketch. This was my Sketch Layer.
I saved the sketch layer as a pattern and then added it as a pattern layer with mask over the sketch layer. I went back to the sketch layer, changed the blending mode to multiply, and reduced the opacity.
Next I lowered the opacity on my brush to about 30 percent, clicked on the Pattern Layer Mask, and painted over it. I went over some areas more than once to give them a darker appearance or more of an outline or additional color.
I added Square Texture 170 from Shadowhouse Creations, (under the duplicated layers), stretched it to fit. deleted the white border, and clipped (I think that's the correct term) the duplicated layers to the texture. I duplicated Square Texture 170 and drug it to the top layer and applied the Overlay blend mode.
After all that, I turned off all the layers and turned the background layer back on. Then I went to the Channels palette, chose/copied the blue channel and pasted it under the Oil Painting layer and changed the blending mode on the blue channel layer to Luminosity, then I changed the Oil Painting layer blend mode to Multiply.
Last, I added a top layer of Antiqued Linen Grunge (by Lauren Bavin http://www.digitalscrapbookplace.com), changed the blend mode to overlay, and reduced the opacity.
I'm not sure I'm through experimenting yet, but if I don't upload this now, it may never get done.